[Tutorial Minecraft] Potion of the Master Turtle, how to make a potion of the master turtle?
1) What is the use of the turtle master potion?
The potion allows you to give a slow and resistance effect. It can give a slow IV and resistance III effect at level I (20 or 40 seconds). Or at level II, it gives an effect of slow VI and resistance IV (for 20 seconds).
2) How do you make the master turtle potion?
First of all, you will need vials.
Item needed to craft them: 3 glasses (use a workbench)
Here's how to arrange them to get them: 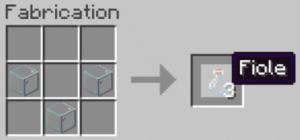
Well, now that you have your vials, you're also going to need a still. This item allows you to make all the potions you want! Without this still, you cannot make your potions on your own.
Items needed to craft it: 3 stones and 1 blaze stick (to get a blaze stick, you need to kill blazes.)
Here's how to arrange the items to get it.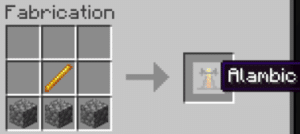
Now you can put your still in your base. Right-click to open the still interface. It is in this interface that you will create your potion(s). Because yes, it is possible to create up to 3 potions at the same time! Don't forget to fill your vials with water.
Now let's get to creating your Level I Master Turtle Potion:
Items needed to craft it: 1 nether wart and 1 turtle shell (excluding potion: 1 blaze powder)
You must go to the interface of the still created previously.
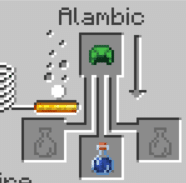
You should know that you need a fuel, which is the famous blaze powder, in order to feed your still. Place it as in the image below: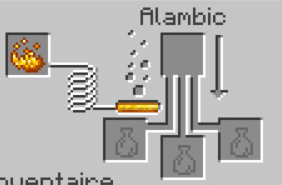
Then follow the next steps:
- Put the vial of water and the nether wart:
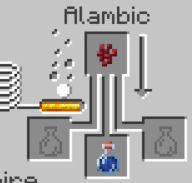
- Add the turtle shell:
Your Level I Master Turtle potion is now ready to use. If you want it to last 40 seconds, add some redstone powder. And to make it disposable, add gunpowder.
To create a Level II Turtle Master Potion, add a luminous powder to your Level I 20 second Turtle Master potion: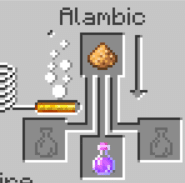
You now know how to create Master Turtle potions.
See the rest of the guides on Minecraft: