To Add a logo to your video in Premiere Pro, import your image file into the project, drag it onto a track above your sequence, and then adjust its size and position in the Effect Options.
Your logo should be a PNG file with a transparent background, otherwise a white background will appear in your video.
Explanatory video in French by Alucare, ideal complement to the page. View video (you can use YouTube's automatic translation)

Adobe Premiere Pro is one of the most widely used professional video editing programs. Adding a logo to your videos is a basic feature that’s useful for both content creators and social media marketing.
It's quick to do and immediately strengthens your brand.
How do I add a logo to my video in Premiere Pro?
Here are the steps to follow to neatly embed your logo in Adobe Premiere Pro :
- Open your editing in Premiere Pro.
- In the project panel, right-click, then click Import.

- Select your logo file from your folders, then click Open.
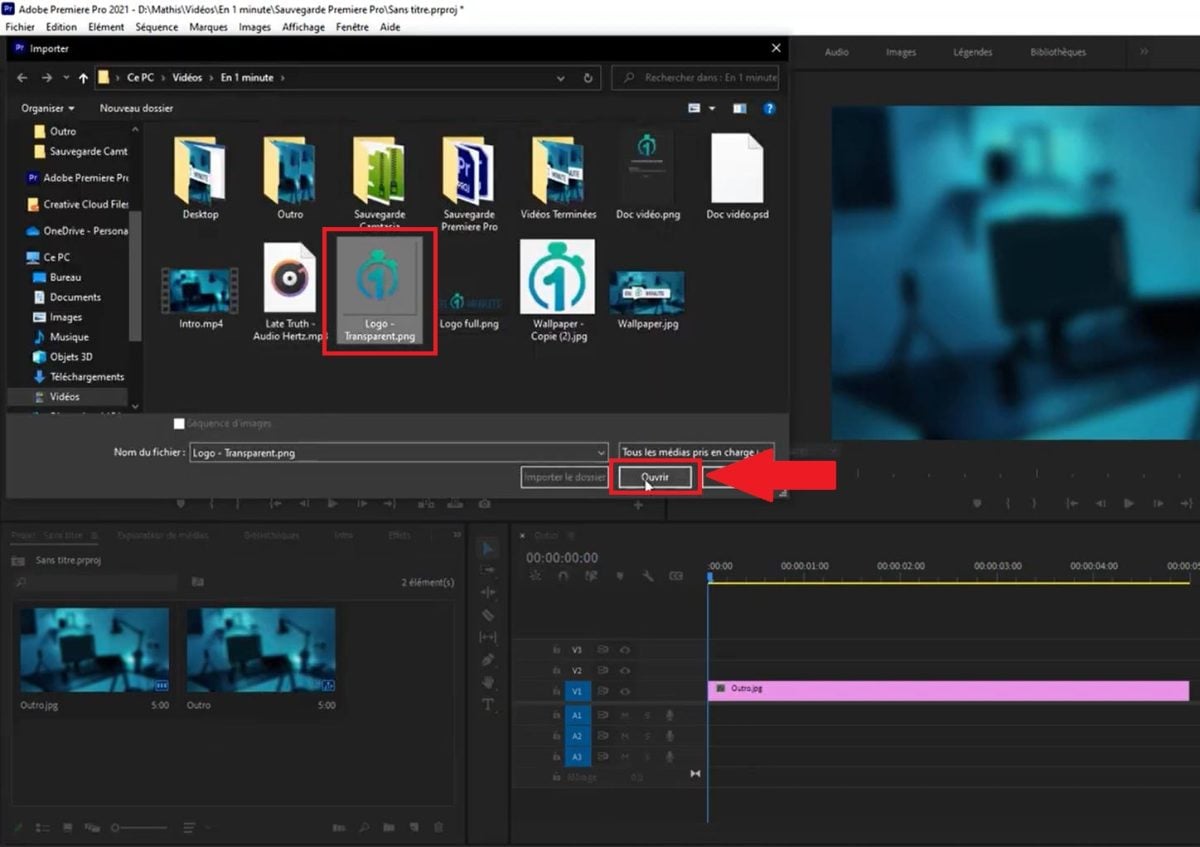
- While holding down the left mouse button, drag the logo onto a video track above of your sequence in the timeline.
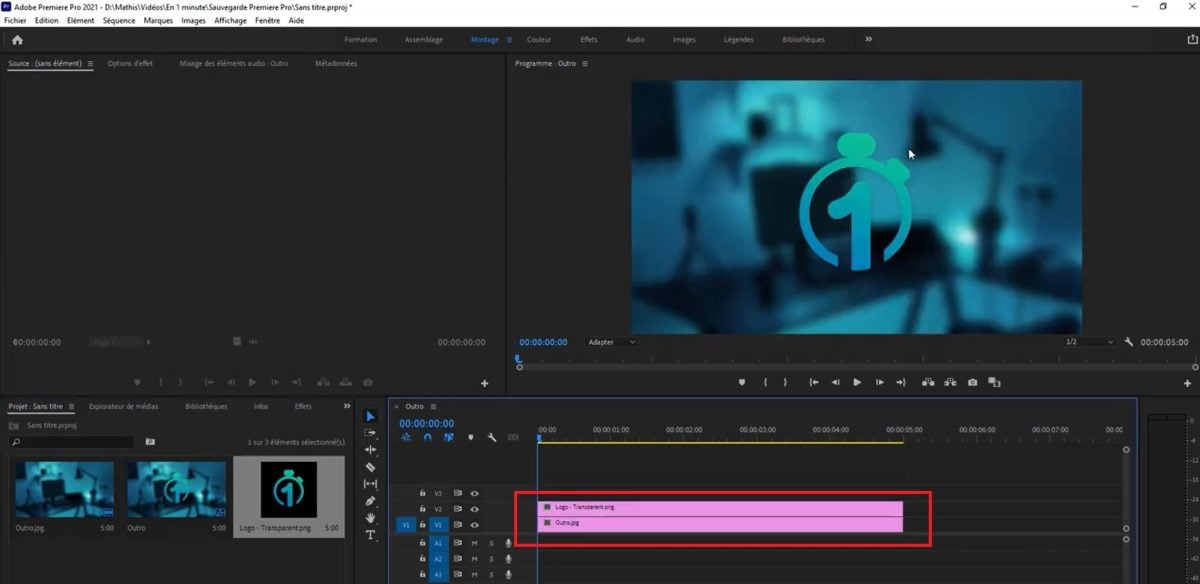
- Select the logo in the timeline, then open the panel Effect Options (Effect Controls in English).

- Open the section Movement and set the parameter Scale between 10 and 15 % so the logo doesn't take up too much space. You can also change the size of your sequence, if necessary.
- Then adjust the Position. To place it in the lower-right corner of a video 1920 × 1080, targets approximately X: 1750 and Y: 1,000.
- Keep an eye on the preview in the Program Monitor and make visual adjustments, since the exact value depends on the actual size of your logo.
These values are just starting points, not a universal rule. If you also want to crop a video, the process is similar and involves the same signs.
Which file format should you choose for your logo?
The format PNG with a transparent background is ideal for adding a logo to a video in Premiere Pro. It preserves the quality and prevents any unwanted background from appearing in your content.
Here are a few tips for choosing your file:
- Use a file PNG and not a JPG : JPG does not support transparency.
- Give priority to a high resolution (at least 500 × 500 px) to maintain good quality even if you enlarge the logo in the sequence.
- Make sure the background is transparent before importing: open the file in an image editor and verify that there is no white background.
- If you only have a logo on a white background, you can use the effect Ultrakey Where Key Color in Premiere Pro to try to remove this background, with results that vary depending on the image.
Animating Your Logo in Premiere Pro
For a promotional video, animate the logo helps capture attention. The presentation is based on key images In the Effect Options:
- Select the logo and place the read head at the beginning of its appearance.
- Click on the stopwatch next to Position Where Scale to create the first keyframe.
- Move the playhead forward a few seconds, then change the value: the software adds a second keyframe automatically.
- This way, you get a logo that slides, grows, or changes position on the screen.
Export your video with the logo
Once you've added the logo to your sequence, be sure to check how it looks before exporting. Preview it in the Program Monitor to confirm that the logo is properly positioned throughout the entire edit.
To export, use the shortcut Ctrl + M (Where Cmd + M on Mac) to open the panel Exporting Media.
Choose a format that's suitable for your distribution platform, such as H.264 for social media. The logo will be embedded directly into the final video file.
Why Add a Logo to Your Videos
Embedding a logo serves as visual signature on your video. This shows that the video has an owner and strengthens your Mark with your audience. This is a useful habit for content creators who post on social media.
If the content is shared without attribution, your logo remains visible at the bottom of the screen, allowing viewers to identify your creation.








 English