To enlarge an image that's too small, the easiest way is an image enlarger Free online: Upload your photo, and the AI fills in the missing pixels; then download it at 2x or 4x resolution. It takes just a few seconds, and there’s no need to install anything.
We'll show you how to do it right below, followed by our 3 tools tested (See the Top 3 →) and finally Photoshop/GIMP if you want complete control.
⚠️ First, a word of honesty: zooming in doesn't reveal details that aren't in the original—we'll explain how to minimize the damage.
The quick way: Enlarge images online for free (2 min)
The fastest, without installing anything : an online image enlarger. We've tested the best ones in our [TOP 3]; here's how to use it in just 3 clicks.
Here's how to do it with Upscale Media (free):
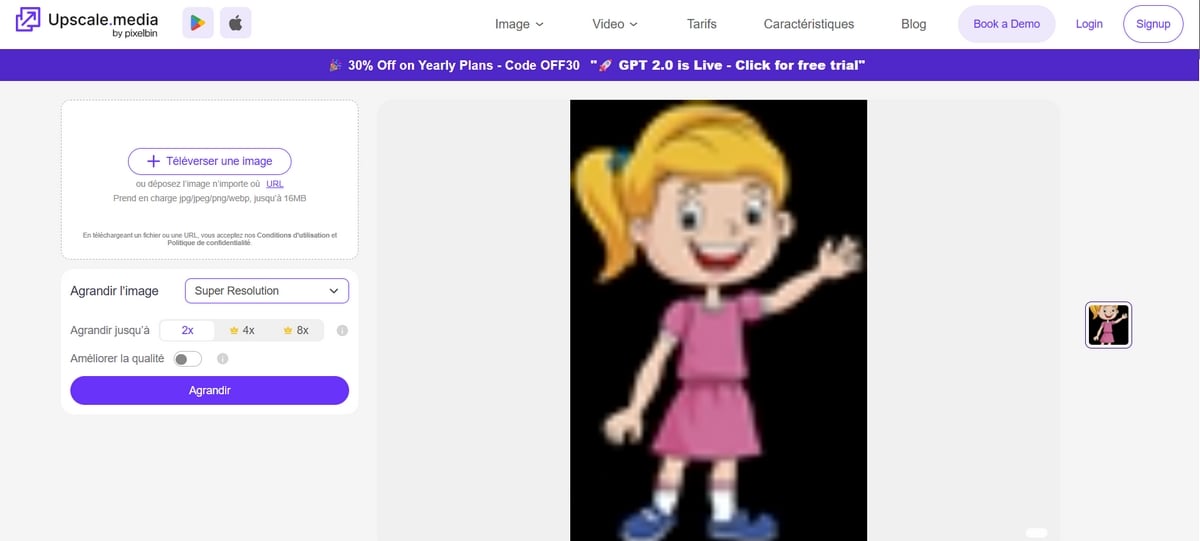
- Meeting on Upscale Media and click "Upload Image" (or drag and drop your photo).

- Choose the magnification factor : 2x to 8x.
- Then click on Enlarge (You can also click on "Improve Quality")
- Click on Download to download your enlarged photo.
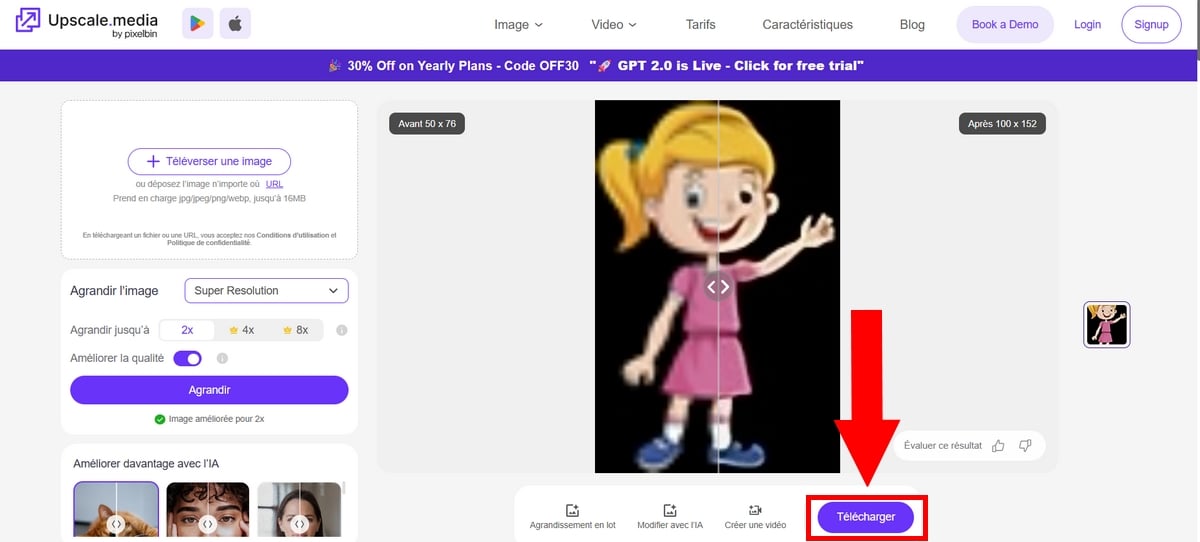
⏱️ That's all, less than 2 minutes. If you reach the daily limit, switch to another free upscaler, or use Photoshop or GIMP for full control.
What a enlarger CANNOT do:
Let's be clear: no tools doesn't turn a thumbnail into a perfect poster. Here's what you can really expect.
- It does not create no details missing. If the original image is small or blurry, the AI does its best to reconstruct an approximation; it does not create sharpness where none exists.
- Beyond 2x–4x, the quality drops. Too much magnification = pixelation, soft edges, and digital noise. Be reasonable.
- The result depends on the starting image. Always start with the best available version : The better the source, the better the enlargement will be.
Enlarge an image using websites and online services
If you need to resize a small image quickly and easily, we recommend using Web sites and other online services.
Some of them are dedicated to image enlargement and offer a simple, free, and accessible solution to give your photos new dimensions.
How can you enlarge an image using online sites and services? Here are the next steps To answer this question:
- Select a website among countless possibilities.
- Select the image that you want to enlarge and download it from the website.
- Enter them new dimensions for your image in pixels, millimeters, or inches. You can also use preset options such as “2x,” “4x,” or “Custom Size.”.
- Some websites offer different methods of enlargement, such as bilinear or bicubic interpolation. Generally speaking, the default method offers a good compromise between quality and speed.
- After applying the defined settings, you will be able to download enlarged image in the desired format (JPEG, PNG, etc.).
One thing you shouldn't overlook before uploading your photos to a website: the privacy. Your files pass through the service's servers, so avoid uploading sensitive documents.
For offline work and complete control over your data, a an image editor like GIMP remains the best option.
Beyond simple enlargement, some enlargers offer features additional : Background removal, color correction, or instant export to high-resolution JPG or PNG files.
These features expand the scope of the magnification tool, and it is best to compare free resources before upgrading to a paid plan. Once you're satisfied with the result, you can download the final file with a single click.
Enlarge an image using AI

L'artificial intelligence is involved in many areas of our daily lives, and image processing is no exception. In fact, image enlargers use AI-based techniques.
Using neural network algorithms, AI can reconstruct missing details in an image and’increase its resolution.
To understand how resize an image with AI, Here are the main steps in the process:
- Image analysis: AI thoroughly analyzes the original image, identifying the structures, textures, and patterns present.
- Identification of details: AI algorithms draw inspiration from a vast set of similar images to learn how to recognize the details and patterns typical of each type of image.
- Reconstruction of image details: Using the knowledge it has acquired, AI creates new information to fill in the gaps and reconstruct the missing details in the image.
- Image enhancement: Artificial Intelligence then refines the enlarged image by smoothing the edges, reducing pixelation, and improving overall sharpness.
Be careful not to confuse a image enlarger with a AI image generator : The latter creates new images based on a text description, whereas an upscaling tool uses your original photo to increase its resolution.
Enlarging an image using photo editing software
If you are comfortable with this type of software, you can manually enlarge your images to obtain an accurate and personalized result.
You will have a choice of a range of tools on the market, such as the essential Photoshop and other popular options such as GIMP or Paint.NET.
Generally speaking, enlarging an image with photo editing software follows these steps :
- Open the small image: Launch your software and open the image you want to enlarge.
- Search for the function to resize an image: Depending on the editing software you use, you will usually find it in the “Image” menu, “Image Size,” or in the toolbar.
- Select the new dimensions: You will have the option of using pixels, millimeters, inches, or other units of measurement.
- Select an interpolation method: This determines how the editing software creates new pixels when enlarging. The most common options are:
- Bilinear which is a quick and easy method, but it can produce blurry images.
- Bicubic, which offers better quality than the bilinear method, but is slower.
- Lanczos, an advanced method that offers excellent image quality, but is even slower than the bicubic method.
When you resize manually, keep an eye on the width and height in pixels: these are what determine the final resolution and appearance of your photo.
By keeping the same aspect ratio, you prevent distortion and preserve the original colors and proportions.
In general, we recommend that you’use bicubic interpolation, as it offers a good compromise in terms of quality and speed.
- Check the “Keep proportions” option: This option prevents the image from becoming distorted when enlarged. This means that the proportions between width and height will be preserved.
- Save the enlarged image: After resizing an image, you can choose the appropriate format (JPEG, PNG, etc.) and then save it to your computer.
Summary of the various methods
Here’s a quick guide to help you choose the right method at a glance, based on your needs, skill level, and budget:
| Method | Perfect for | Free? | Quality |
|---|---|---|---|
| 🌐 Online sites (Upscale Media, Icons8) |
Beginners in a hurry, quick scaling for the web or social media | ✅ Yes (maximum size and watermark allowed) | 👌 Great |
| 🤖 AI Enlargers | Old photos, significant resizing, detail restoration | ⚠️ Often freemium (HD exports require payment) | ⭐ Excellent |
| 💻 Software (Photoshop, GIMP, Paint.NET) |
Advanced users who want pixel-by-pixel control and the ability to work offline | ❌ Paid (Photoshop) / ✅ Free (GIMP, Paint.NET) | ⭐ Excellent (depending on skills) |
FAQs
Why enlarge an image that is too small?
Enlarging a small image can be necessary in many situationsnamely :
- Improved visibility :
A large image makes it easier to distinguish details and important elements. This can be crucial for presentations, posters, or marketing materials.
- Large format printing:
If you want to print an image in a large format, such as a poster or banner, it is essential to enlarge it beforehand to achieve optimal print quality.
- Use on online platforms:
On social media, blogs, or websites, a large image can attract more attention from visitors and have a stronger visual impact.
- Cropping an image:
Enlarging an image can give you more flexibility and allow you to select the area you are interested in.
- Restoring an old image:
If you have an old blurry or pixelated image, enlarging it can help improve its quality and make the details easier to see.
In addition to these reasons, please note that enlarging an image can be particularly relevant in the following cases :
- To illustrate your professional presentations, in PowerPoint or Keynote, with striking, clear images.
- To create marketing materials (posters, flyers, or brochures) with high-quality visuals.
- To highlight your products, services, or blog posts with attractive images.
- To capture your subscribers' attention on your social media accounts (Facebook, Instagram, or X) with large images.
- To give your family photos or vacation photos and print them in large format.
Thus, enlarging an image can be a useful solution for improve the visibility, impact, and versatility of your visuals. However, it is important to choose the most suitable technique to preserve the quality of your resized image.
What file formats can I enlarge (JPG, PNG, WEBP)?
Most tools support the most common formats: JPG, PNG, but also WEBP and, depending on the service, the HEIC (iPhone photo format).
Please check this before uploading your file, as some platforms export only as JPG or PNG as an output format. If you're working with a less common format, image editing software remains the most flexible solution.
Which tool should I use to enlarge a photo?
It all depends on your needs. For quick use, a image enlarger All you need is a web-based tool or a mobile app to enlarge a photo in just a few seconds.
For a professional project where Every pixel counts, an editor like Photoshop or an advanced resizing tool offers much finer control. Ask yourself what the end goal is before making a decision: that’s what determines the right tool.
For more information, see also What is the definition of image in pixels?
By enlarging your small images, you will be able to improve the visibility and impact of your visuals. But it is important to keep these precautions in mind and use them wisely.
Don't forget that the final image result will depend on the quality of the original photo and the enlargement method chosen.
If you would like to explore other horizons, discover other articles on our page. AI. There comment area is open if you'd like to have your say.







 English