To change the language to Premiere Pro, the simplest and most reliable way is to use the app Creative Cloud of Adobe, even before launching the software. Open the application Creative Cloud, go to Preferences, select the desired language from the list of available languages, then restart (or reinstall) Premiere Pro to apply the change. This setting applies to all applications Adobe Creative Cloud installed on your computer.
There is a second method available through the software's built-in console (Debug Database View) : It's still useful on some versions, but the option Creative Cloud Works with all recent versions of Windows as on Mac. This allows you to change the interface language, as well as the language of the audio transcription in your projects.
Changing the language is useful if you want to share your projects with an international team, if you’re following a tutorial in another language, or if your add-ons display better in a specific language. Here are the steps to follow depending on your situation (article updated in June 2026):
- Change the interface language Premiere Pro
- Change transcription language Premiere Pro : How do I do that?
This instructional video explains the steps to follow to change the language on Premiere Pro :

Change the Premiere Pro interface language
To change the language on Premiere Pro, the easiest and most reliable way is to use the app Creative Cloud Before launching the software: open the application's preferences, select the desired language, and then reinstall or restart it Premiere Pro to apply the change. A second, more advanced method involves using the software's built-in console. Here are the details for both methods, depending on your version of’Adobe.
Method 1: Change the language using the Creative Cloud app
This is the official procedure recommended by Adobe. It runs on Windows as on Mac and changes the language of all your apps Adobe.
- Open the application Creative Cloud on your desktop (icon in the upper-right corner of the screen); ;
- Tap your account icon or the menu icon, then select Préférences ;
- In the tab Applications, locate the section Langue d’installation (Where Langue et région) ;
- Open the menu to view the list of available languages, then select the language you want; ;
- Confirm, then reinstall or restart Premiere Pro since the application Creative Cloud to apply changes.
The list of supported languages depends on your subscription and your region. You can find the complete, official list at the Adobe language support.
Method 2: Change the language via the console (advanced method)
This method allows you to change the language directly in Premiere Pro, without reinstalling the app. It's still useful if you want to quickly switch from one language to another, or if, for example, you want to Trim a video in Premiere Pro in a specific localized interface.
- Open the software and create a new project; ;
- On the project screen, click Ctrl + F12 at Windows, Where Fn + Cmd + F12 on Mac ;
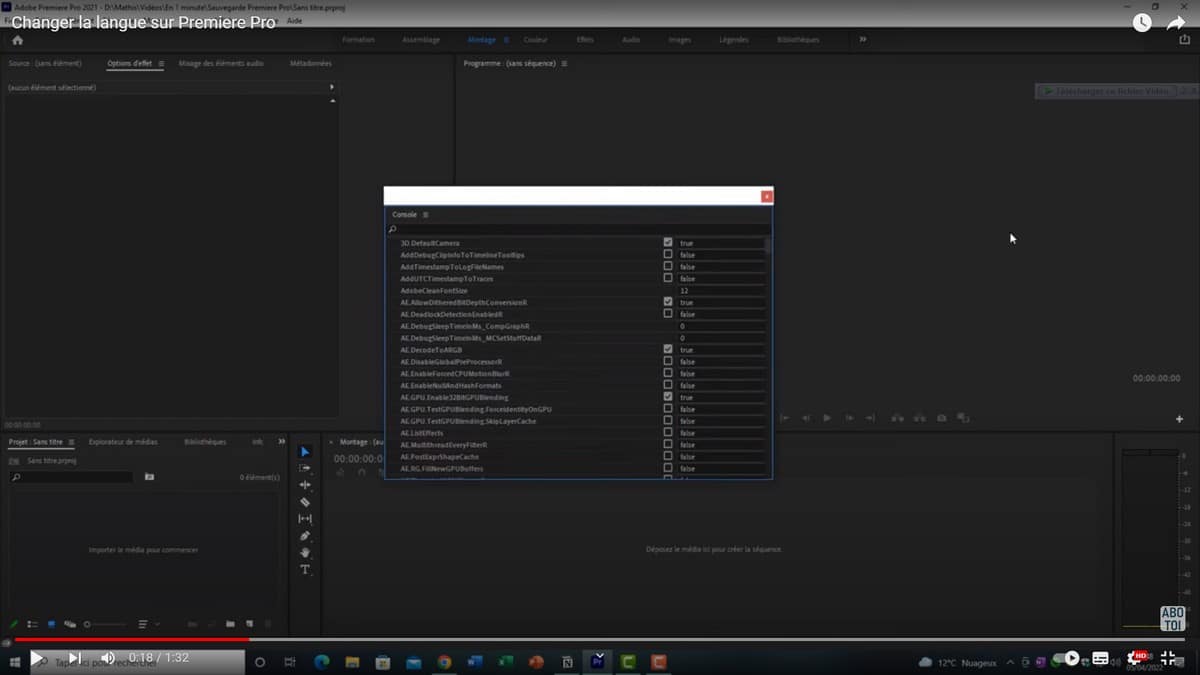
- A Console window will open; ;
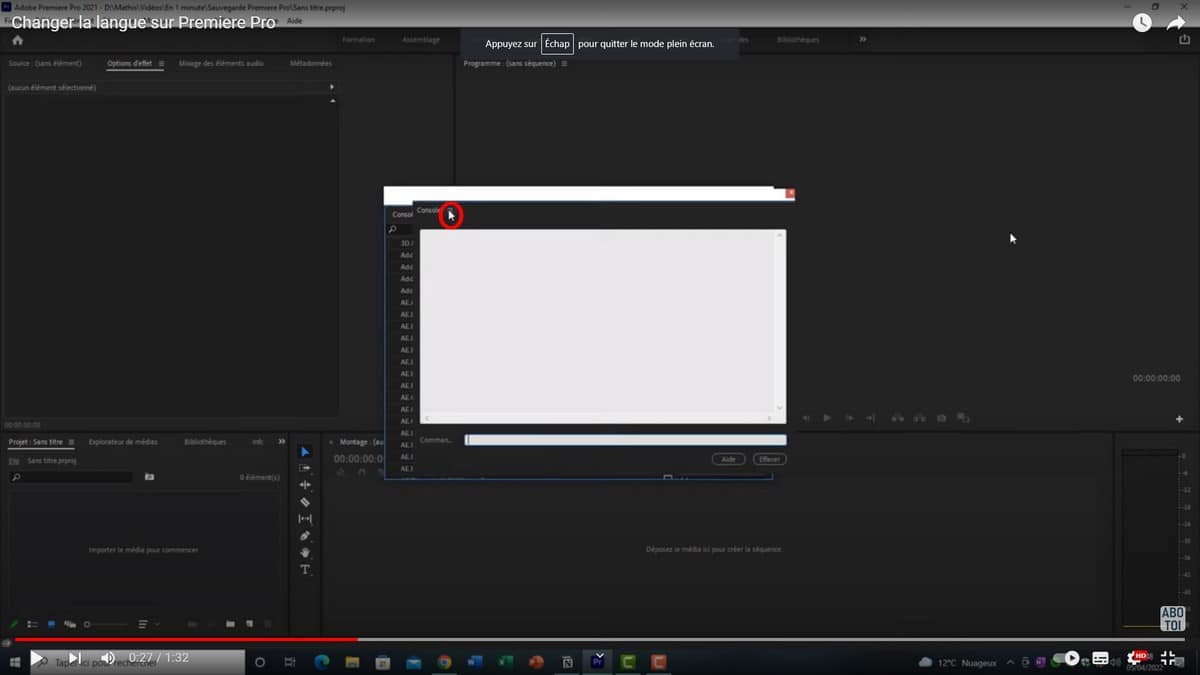
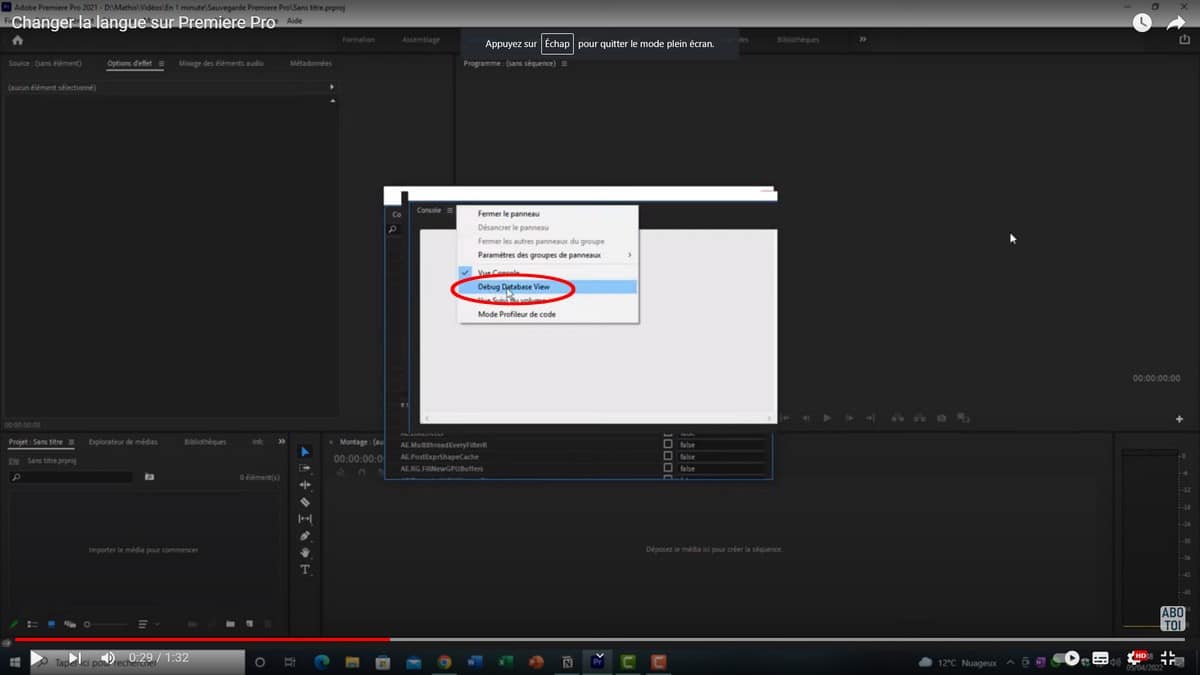
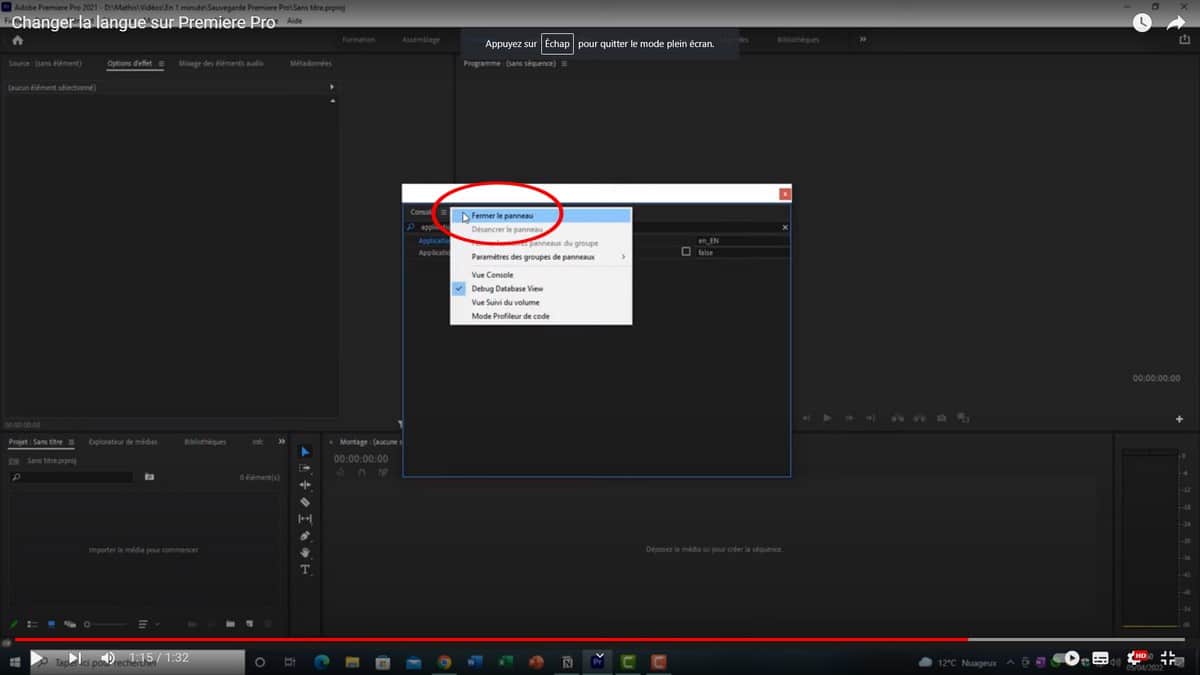
- Click on the three strokes located next to the Console tab; ;
- Select Debug Database view ;
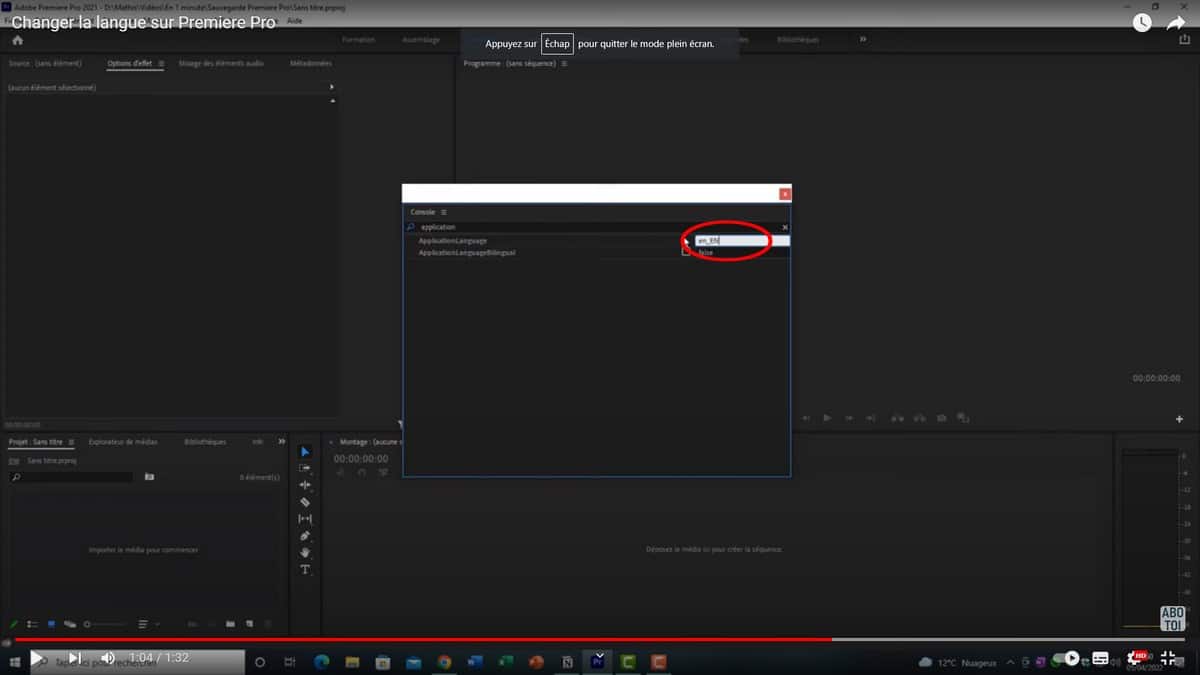
- In the search bar at the top, type the word application ;
- Then click on the setting ApplicationLanguage ;
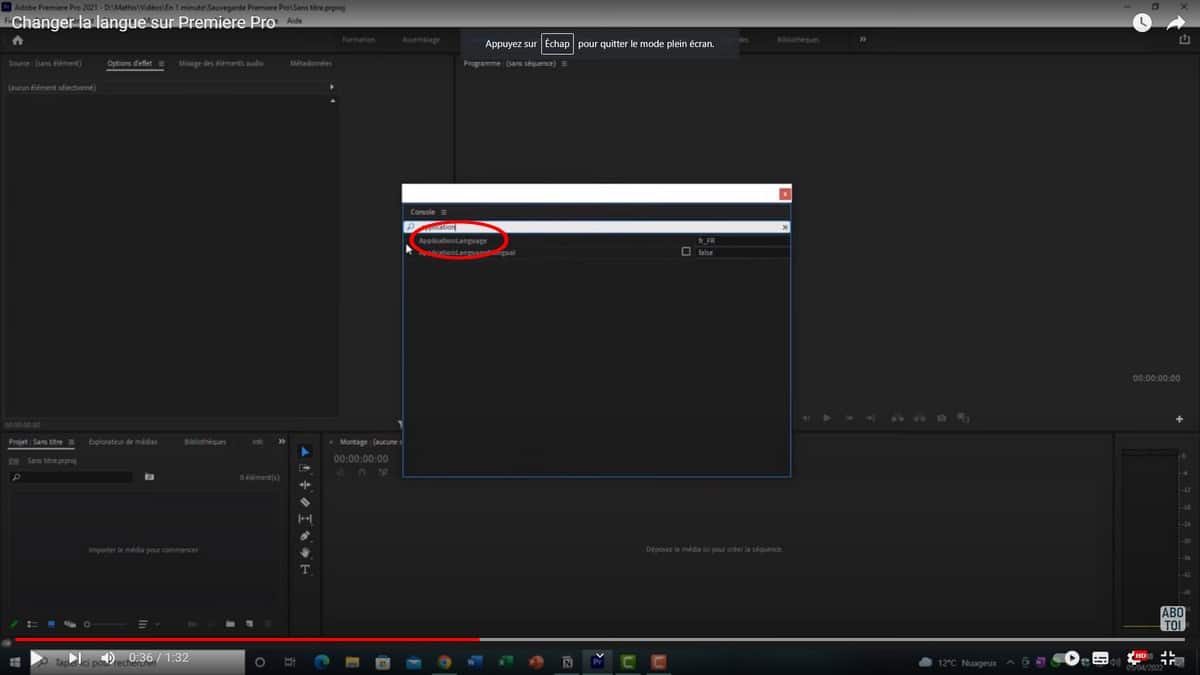
- Enter the code for the selected language in place of the displayed value; ;
- To set Adobe Premiere In French, enter the code fr_FR ;
- To switch to English, enter the code en_US (American English) or en_GB (British English).
- Click the three horizontal lines at the top again, then close the panel; ;
- Finally, restart the software to apply the changes.
In summary: the app Creative Cloud remains the safest way to permanently change the language of your applications Adobe, while the console offers a quick switch directly to Premiere Pro. To take your video customization to the next level, check out How to Add a Logo to Your Premiere Pro Video.
How to change your Premiere Pro transcription language
To change the language of the transcript in Premiere Pro, everything is done in the "Text" panel: you select the language spoken in your video when you create the transcript. If the language you want doesn't appear in the drop-down menu, you'll need to download the corresponding language pack from the app Creative Cloud or from within the software itself. Here are the two methods.
From Premiere Pro
- Open the Window menu, then click Text to display the corresponding panel.
- On the Transcription tab, tap the “Create Transcription” button and select the settings that apply to your project.
- Click the Language drop-down menu to view the list of available languages, select the language of your choice, and then click the download icon to install the language pack on your system.
English is already included during installation, but you can add other languages as needed (French, Spanish, German, etc.).
From the app Adobe Creative Cloud
- In the app Adobe Creative Cloud, select "All Apps" in the left navigation pane.
- Click "More actions" next to Premiere Pro, then select Add-ons.
- From the list of available languages, select your language and click Add to start the download.
When you reopen the software, the language change takes effect immediately—even before you open a new project. You can then share your projects directly in the language you’ve chosen. To further enhance your projects, you can also learn how to Add an audio fade in Premiere Pro.
A Quick Note on Language Codes
If you manage your subtitles or metadata manually, Adobe uses locale-type codes: fr_FR for French and en_US for American English (and not variants such as “en_Fr" Where "en-En“, which are invalid). For SRT subtitle files, the short ISO 639-1 format (for example, “_fr" Where "_en“) is often required. The complete list of supported languages can be found on the official help page for’Adobe.
If the language doesn't change
The module has been updated, but nothing has changed? Close and completely restart the application. Under Windows as on Mac, also check your connection and make sure your subscription Creative Cloud is working properly. If the problem persists, reinstall Premiere Pro since the application Creative Cloud ensures that the selected language is taken into account.
Do you have any other questions about changing languages or transcription? Post them in the Comments section, and we'll answer them there.








 English