Video editing software Adobe Premiere Pro is one of the best tools for making your content even more attractive.
In this article, we discover how to crop a video in Premiere Pro.
Crop a video manually in Adobe Premiere Pro
Explanatory video in French by Alucare, ideal complement to the page. View video (you can use YouTube's automatic translation)

Here are the next steps To trim a video in Adobe Premiere Pro:
- First of all, go to the software and import a video for your project.
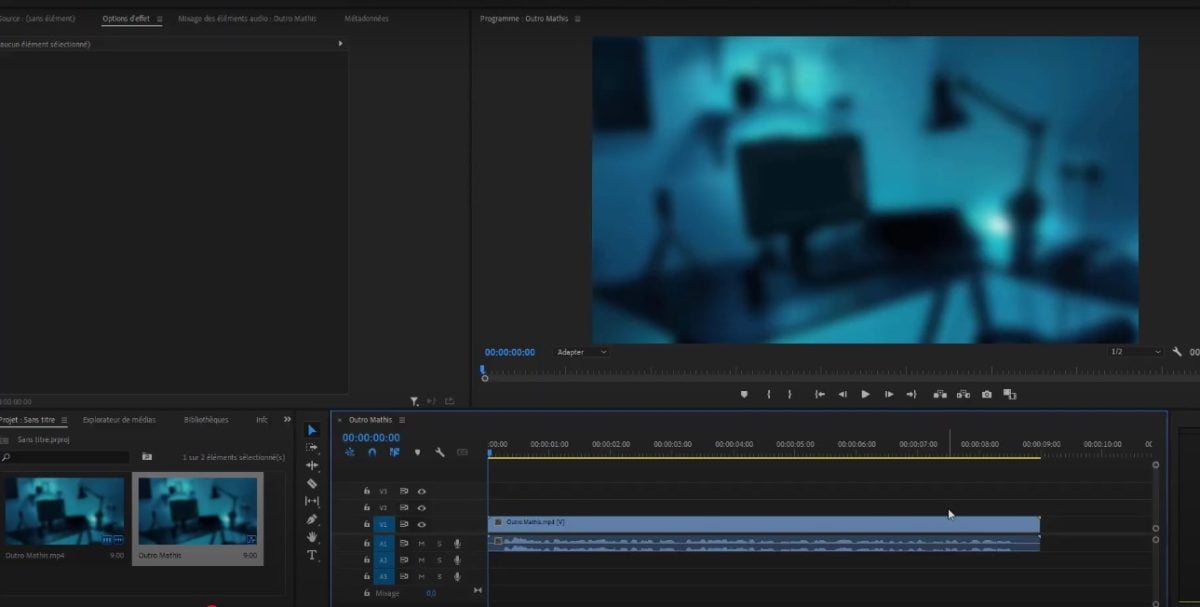
Video imported into Premiere Pro. ©Antonin for Alucare.fr - Then go to the Effects and click on Video Effects.
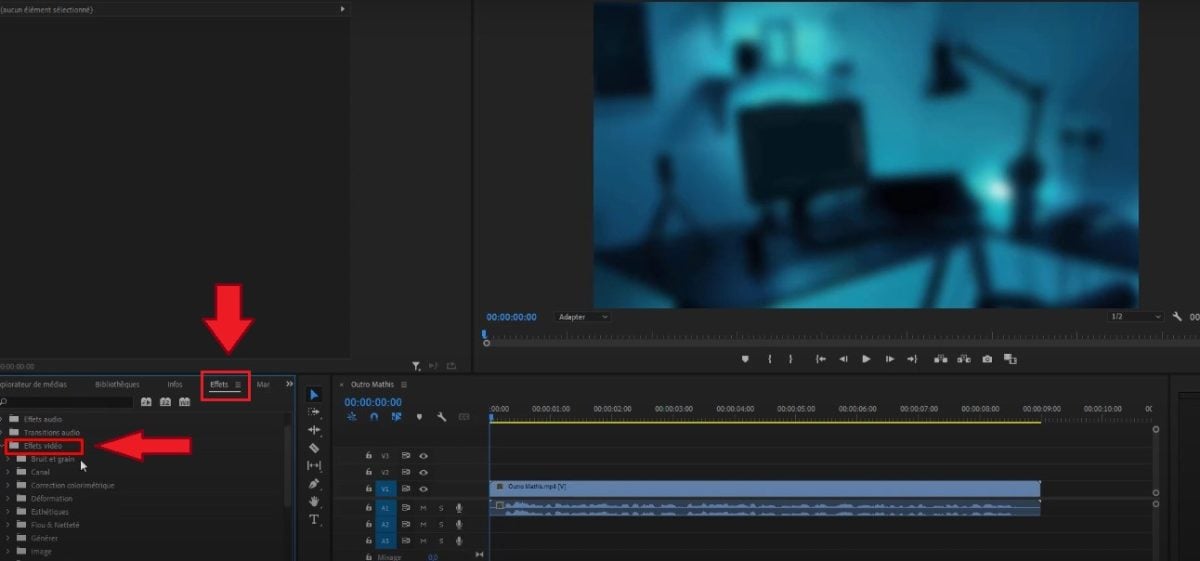
Video Effects option in Premiere Pro. ©Antonin for Alucare.fr - Scroll down to find the tab Transformation.
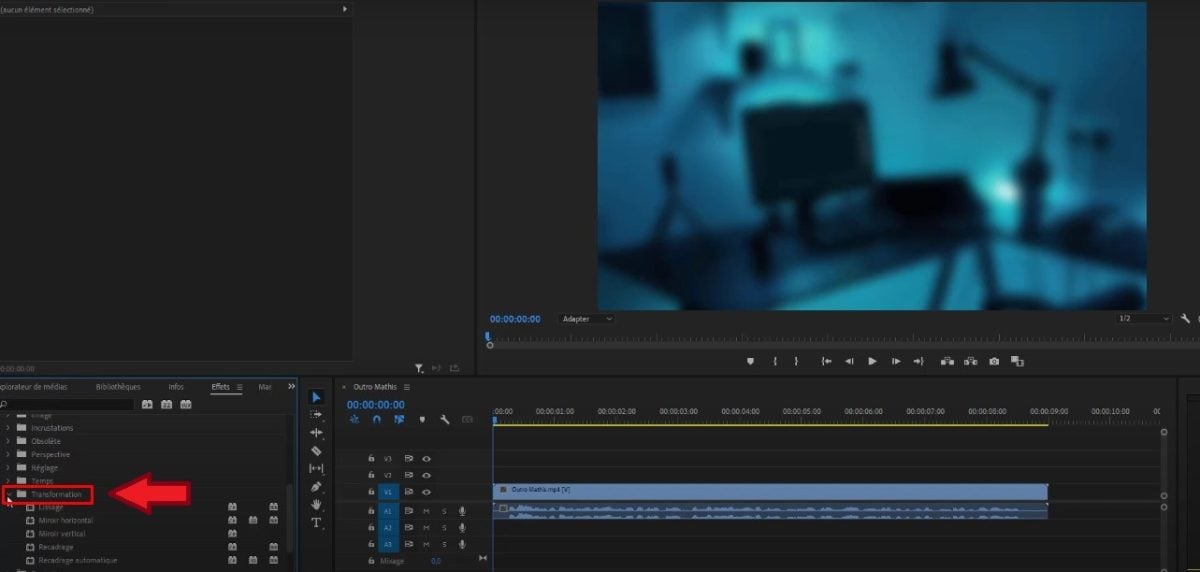
Transform option in Premiere Pro. ©Antonin for Alucare.fr - Drag the effect reframing on the project.
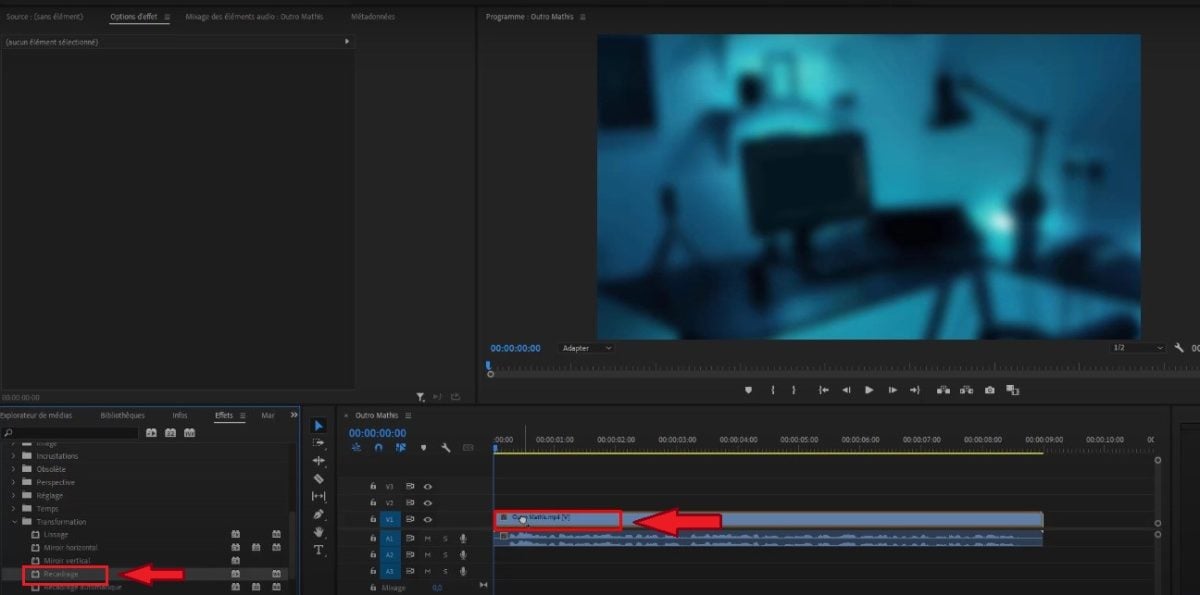
Slide the Crop effect. ©Antonin for Alucare.fr - Go to the “Effect option”.
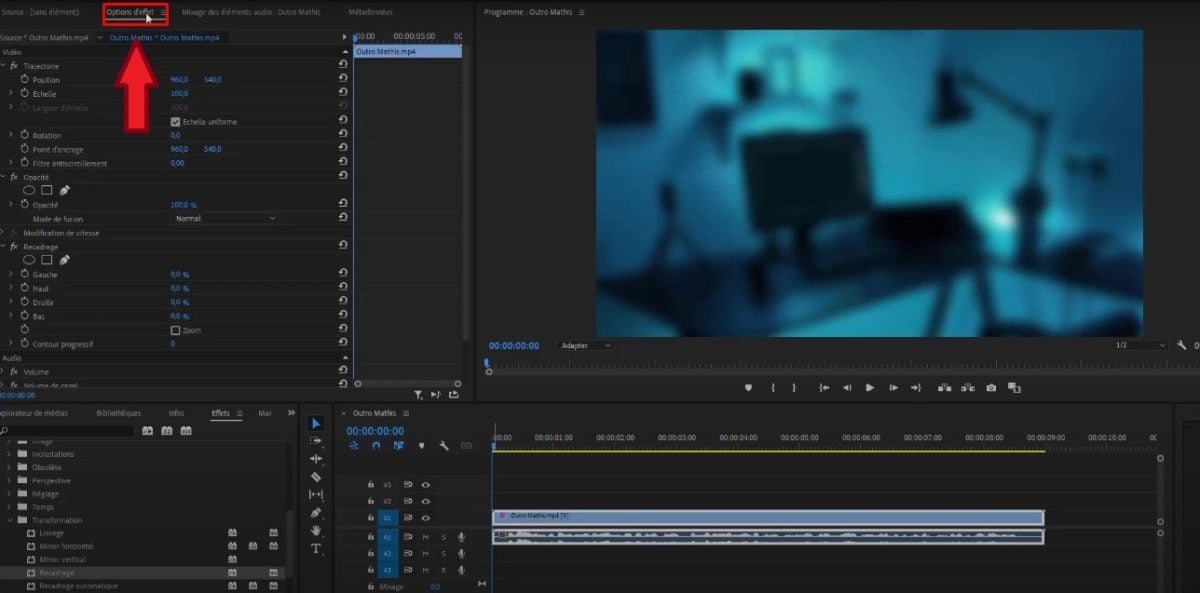
"Effect Options" section in Premiere Pro. ©Antonin for Alucare.fr - To crop or re-crop the video, go to the Reframing.
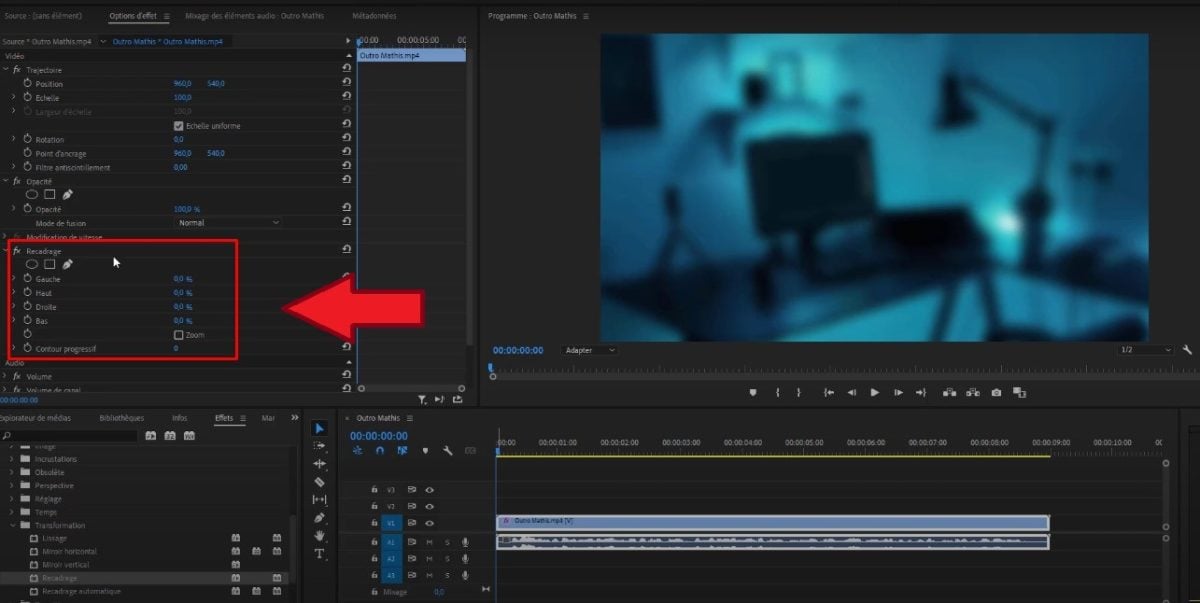
Cropping in Premiere Pro. ©Antonin for Alucare.fr - start with change percentage from the left by holding down the left mouse button and moving the cursor to the right. Continue by changing the top of video proceeding in the same way. The same applies to the right and bottom sections.
To successfully add an audio fade in Premiere Pro, feel free to refer to another article on our website!
Automatically crop a video in Premiere Pro
Automatic cropping uses built-in AI in Adobe Premiere Pro. There are two types of cropping to note, depending on the number of elements to be cropped in a single operation. Here's what you need to know.
Automatic cropping of a single element
start with Open your video in Premiere Prothen :
- Click on Video effects.
Video Effects option in Premiere Pro. ©Antonin for Alucare.fr - Enter Transformation.
Transform option in Premiere Pro. ©Antonin for Alucare.fr - Click on the auto-crop option and slide cropping the video to be cropped.
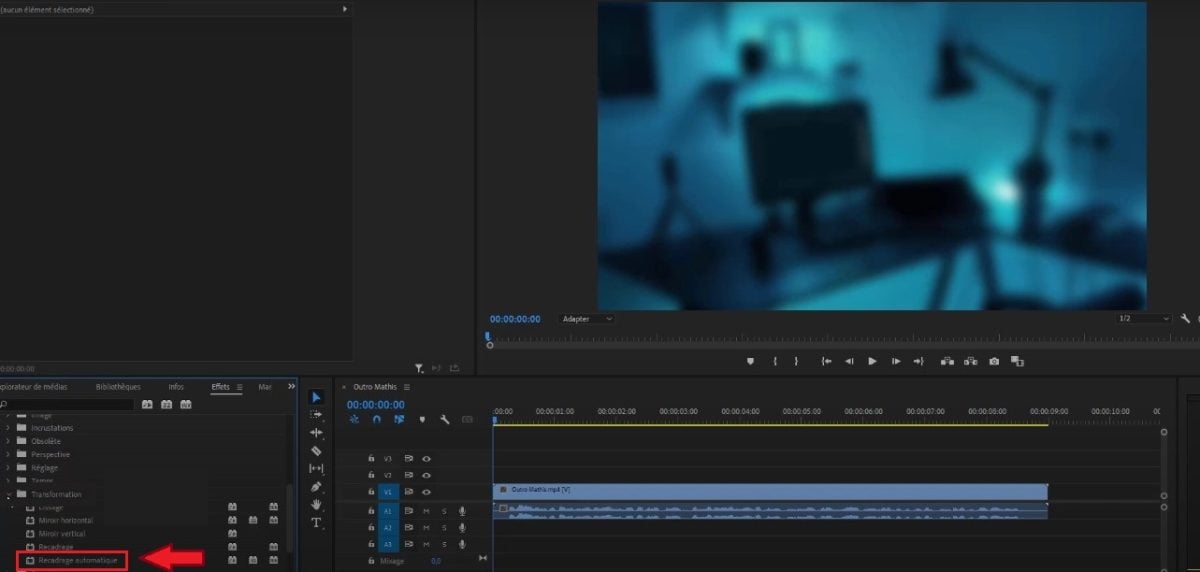
Automatic cropping option in Premiere Pro. ©Antonin for Alucare.fr
Notes:
You can refine Auto Crop using the Motion Tracking option in Effect Options.
The software will generate motion keyframes that follow the action in your video to make it enjoyable to watch. You can select one of the following options:
- In slow motion For little or no camera movement, as in a video with fixed framing on the face.
- By default Suitable for most content. The result may be unsatisfactory if the action is very fast.
- Fast forward : ideal if the video contains a lot of action (extreme sports videos are a good example). Automatic cropping keeps the moving object in the frame and provides key images for your content.
You can also, to suit your needs :
- Replace the path generated.
- Use the options to fine-tune the crop: Position adjustment, Crop scale, Crop offset, Crop rotation.
Find out more in another article on our website how to add a logo to your video in Premiere Pro.
Automatic cropping of an entire sequence
Here's what to do if you want to reframe an entire sequence on Premiere Pro :
- In the Sequence section, enter Automatically crop sequence. But you can also click with the right button in the Project panel and press Automatically crop sequence in the context menu that opens.

Automatically crop a sequence in Premiere Pro. ©Antonin for Alucare.fr - Then select the Format (You can use the preset settings or choose a custom aspect ratio.)

Format of the sequence to be cropped in Premiere Pro. ©Antonin for Alucare.fr - Premiere Pro will then create a duplicate sequence with the dimensions requested in the new sequence.
Notes:
- You will find the new sequence recorded in the automatic cropping folder sequences that you can see at the root of the "Project" panel.
- Here, too, you can refine reframing by choosing one of the options: Slow motion, Default or Fast motion.
- If you want to keep the original motion of your cropped sequence, you can apply theinterlocking of elementsThe software will then place all your videos in a "box" and use the original cut points and track masks without having to modify your images or the video's audio.
- Interlacing should be used if the sequences contain movements that need to be preserved or if they have a setting for speed and time.
- The interlocking of clips does not guarantee that the smooth transitions. In fact, nested clips do not include media support.
- If you have a complex sequence with fast motion or several points of interest, it may be worthwhile to set the key frames in the sequence. after reframing.
FAQs
How do you adapt your video to your screen after cropping?
Even though cropping an image in Adobe Premiere Pro is a simple step, it is often not enough. If you crop your image, you will see black borders on the sides.
So how do I resize images to adapt them to your screen ?
- Enter the effects panel and open the Trajectory tab.

Effect Options and Trajectory in Premiere Pro. ©Antonin for Alucare.fr - Go to the tool Scale and change value to resize your image to fill the entire space.
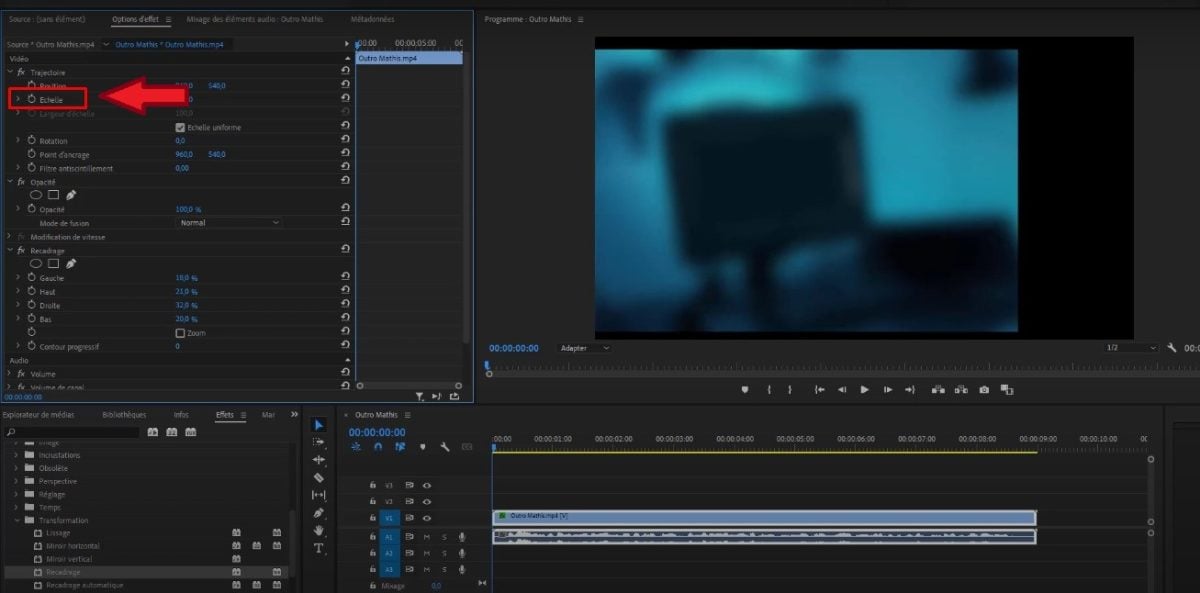
Scale option to resize the video on the screen. ©Antonin for Alucare.fr - You can then move your own image using the tool Position still in the Trajectory tab to perfect the final result.
- You can also check the box Zoom to adapt the cropped video to the project screen.
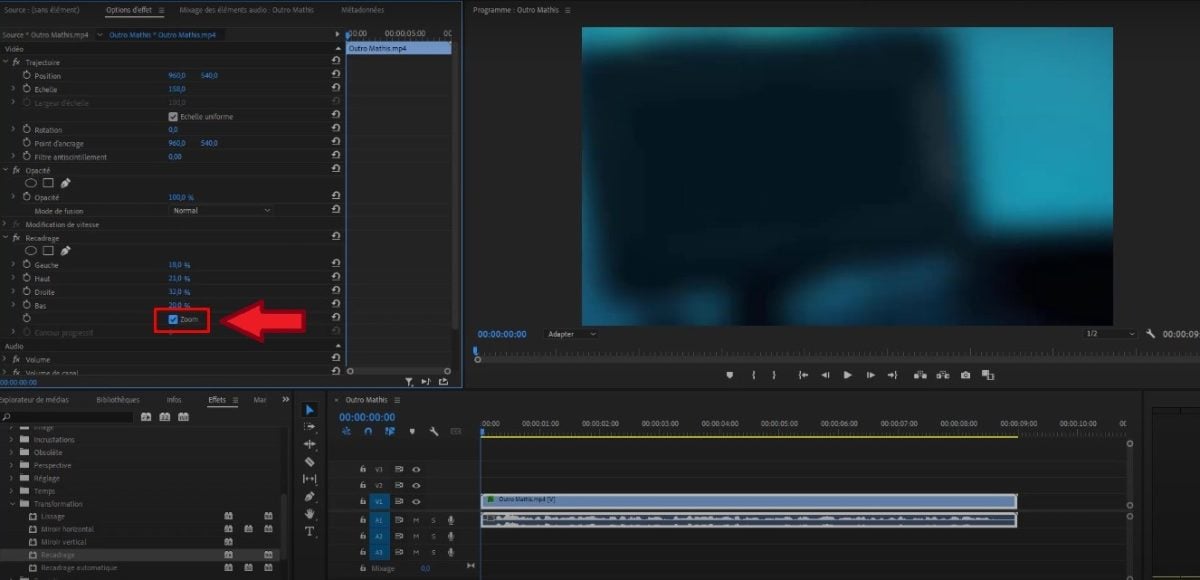
Zoom option to fit the cropped video to the screen. ©Antonin for Alucare.fr
It's okay, the cropped image will finally be adapted on your Adobe Premiere Pro screen!
What are the common mistakes to avoid when trimming?
Here are a few points to note When trimming a video in Premiere Pro:
| ❌ Error to avoid | 📃 Details |
|---|---|
| Do not leave a space around topics |
|
| Do not create securities on Premiere Pro |
|
| Using still images |
|
| Do not preview result |
|
| Do not check the aspect ratio cropped video |
|
| Do not consider the video quality |
|
| Apply the automatic cropping effect several times |
|
Which video format is best for Premiere Pro?
The best video format to use in Adobe Premiere Pro is H.264.
- This is a standard format which you can find in the drop-down menu for video export presets.
- It is also known as the advanced coding (STROKE).
- This format is compatible with all major streaming protocols.
Editor's note: Although H.264 is excellent for export (final delivery), professionals often prefer to work with intermediate codecs (such as ProRes or DNxHR) as source formats. These less compressed codecs ensure better editing performance in Premiere Pro.
As for export, you can export your videos in AVI, MP4, TIFF sequence and other formats.
In conclusion :
- Adobe Premiere Pro software offers advanced tools for cropping videos and images, making it easier to improve the visual rendering of your projects.
- You can crop manually Where automatically a video.
- The procedures to trim a video include importing, applying effects and adjusting borders, and post-processing cropping.
If you have any questions, feel free to ask them in the comments.








 English