To stream on Twitch with OBS, here's everything you need to know: from downloading to the first direct, from the software to the settings for the’interface.
Want to take your stream to the next level? Join the Discord and contact me privately (please follow the tutorial first):
What streaming software should I use to stream on Twitch?
The best choice is still OBS Studio : a software program free, open source, and 100%—free, compatible Windows, Mac, and Linux, used by most streamers. It handles both the’video recording and the live streaming.
In practical terms, you can create scenes, add some sources (gameplay footage, camera, text, images), adjust the’sound using an intuitive mixer, and start your stream in just a few clicks. A big community also maintains plugins to expand its features.
There are alternatives, but they are less convincing. XSplit costs money. For true control over your quality and performance, OBS Studio is still the best compromise.
How to set up OBS for streaming?
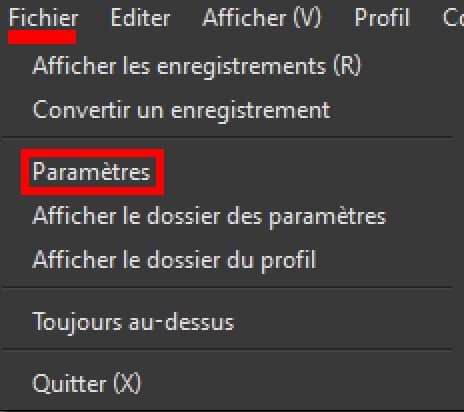
Spear OBS Studio, then go to File at the top, then Settings. Everything is managed from this window.
The easiest way: the automatic setup wizard
Before adjusting everything manually, use the wizard built into the’interface ofOBS. Go to Tools, then Automatic Configuration Wizard. Select the option Optimize for streaming, log in to your account Twitch and let the software run the test.
OBS analyzes your connection and hardware, then suggests the best settings for flow rate, of resolution and D'encoding. This is the fastest way to get off to a good start with your first direct.
Link Your Twitch Account in OBS
In Settings, open the section Stream and choose Twitch as a service.
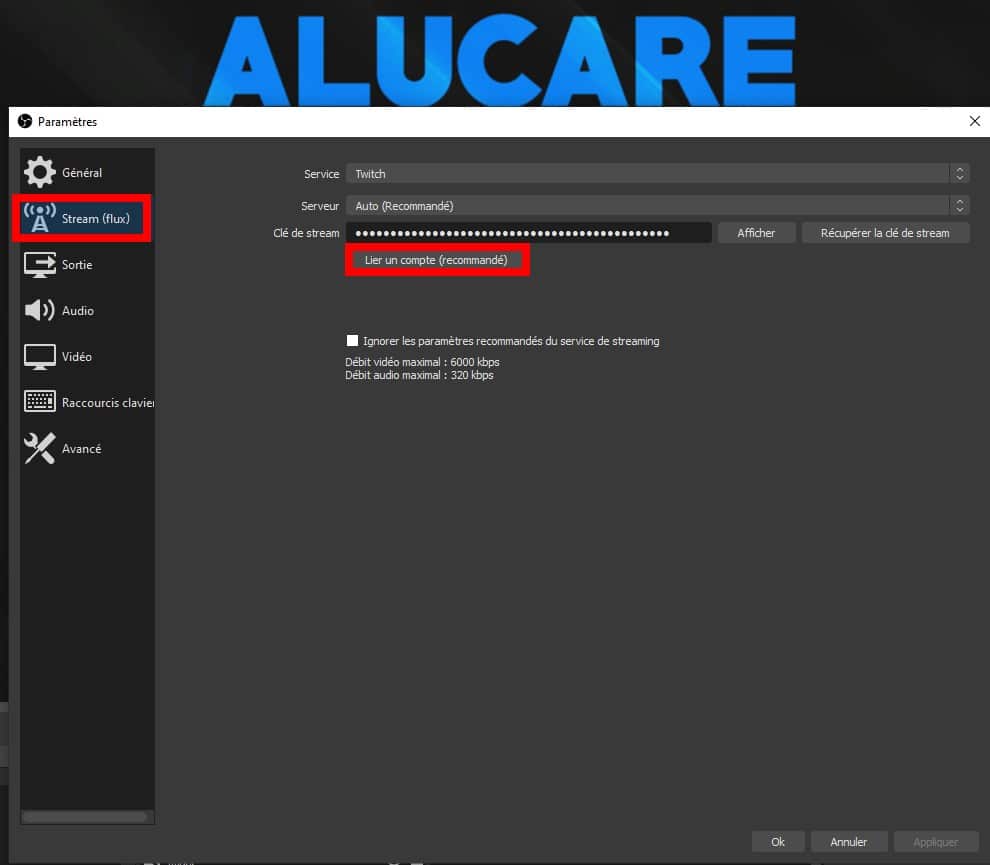
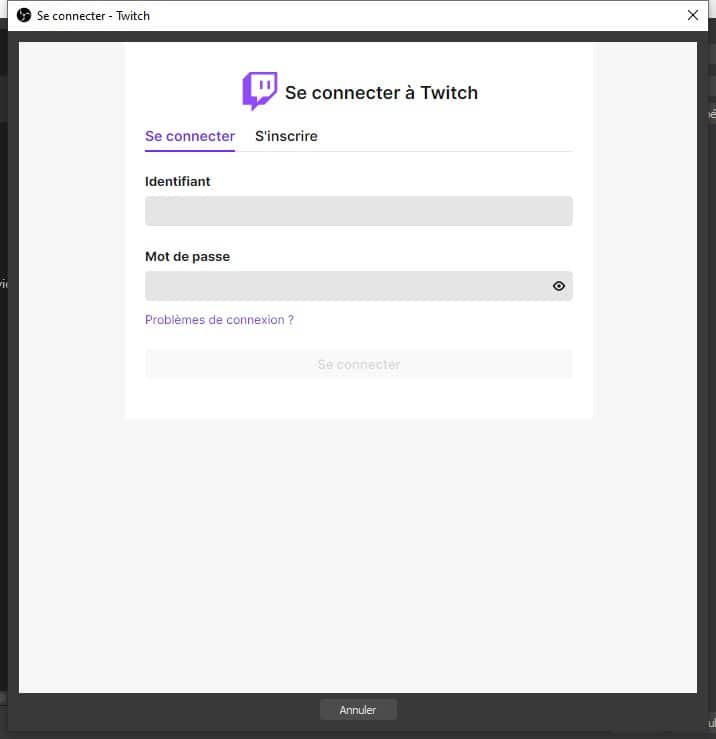
Click on Log in to your account and log in at Twitch. It's more convenient than pasting your stream key manually, and as a bonus, you get direct access to the chat and information from the direct from the docks at’OBS.
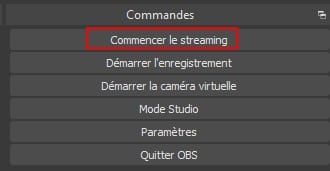
Once linked, a button Start streaming appears in the lower right corner of the’interface.
If you don't know your PC's exact configuration, come discuss it on the:
Alucare.fr on DiscordAlucare.fr on Discord
Adjust the video
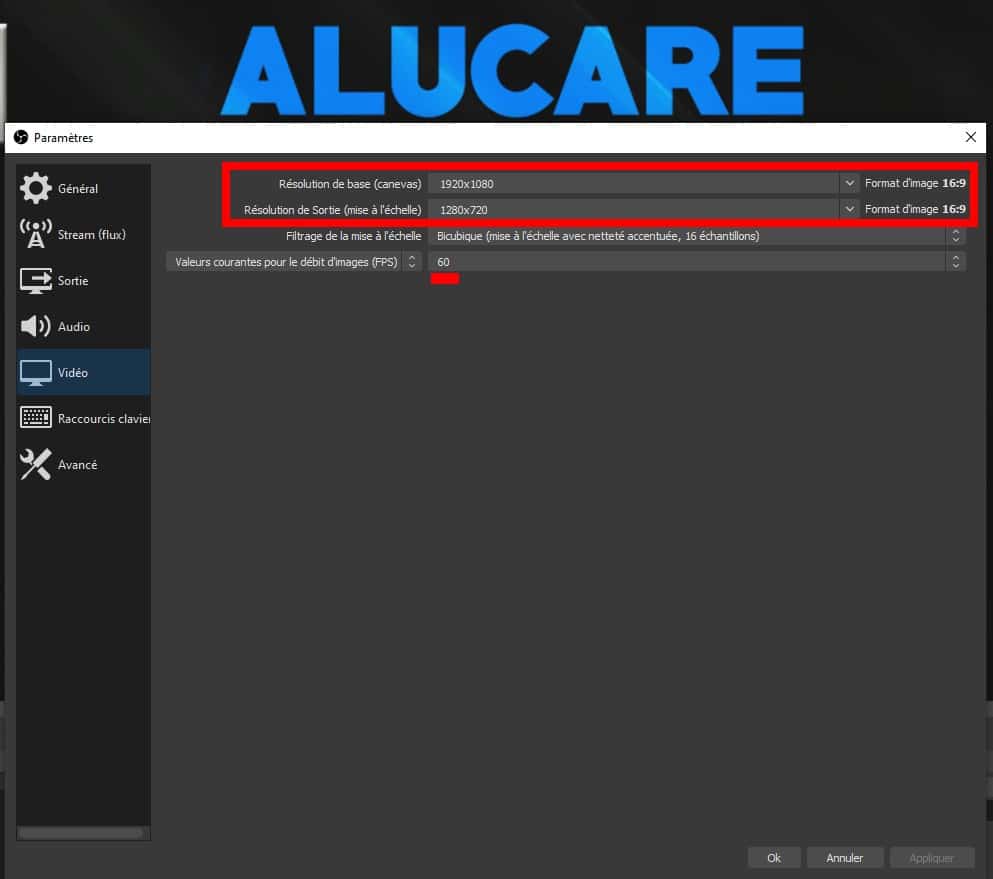
Open the section Video settings. Here are the recommended values:
- Basic resolution (outline): 1920×1080
- Output resolution: the same if your PC is powerful; otherwise, lower it to 1280×720
- Frames per second: 60 FPS maximum
If your computer is a bit outdated, lowering the output resolution will give you fluidity and take some of the load off your processor.
Adjust the output (encoder and bit rate)
Go to the section Exit and put the output mode on Simple. This section also manages the’registration : You can specify a folder there to save a local video from each one live streaming.
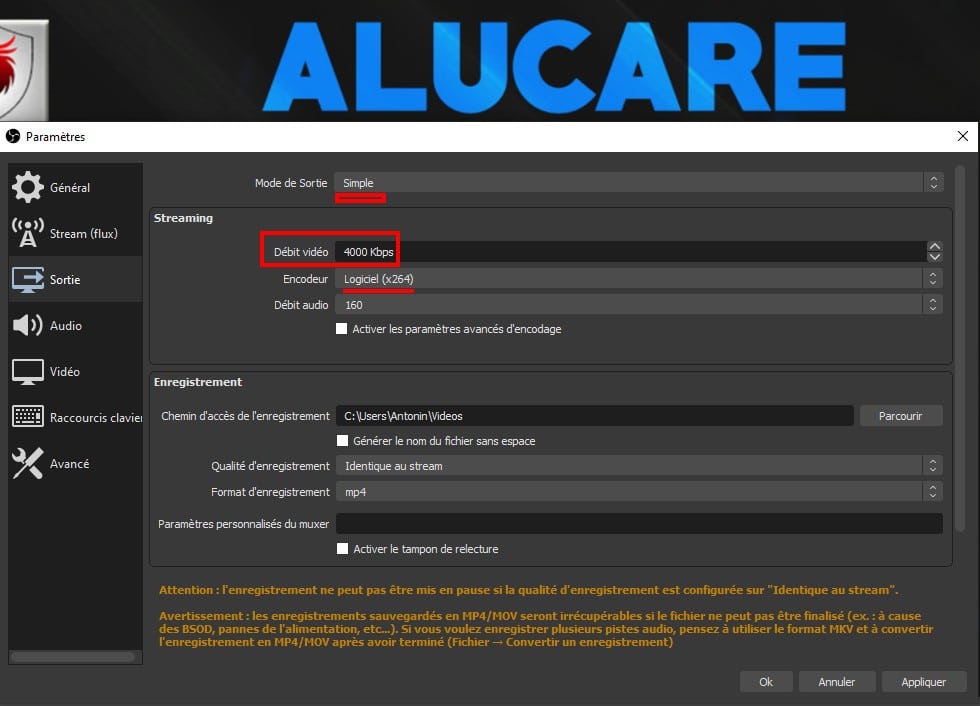
The choice of the’encoder It depends on your graphics card:
- Map Nvidia recent: choose NVENC
- Map AMD recent: choose AMF
- Processor Intel with a graphics chip: QuickSync
- No dedicated GPU: stays on Software (x264)
On a recent GPU, the’hardware encoder It reduces the load on your processor while delivering quality at least equivalent to x264. The x264 option is only worth using if you don't have a dedicated graphics card.
For the video bitrate, start by running a speed test to find out your upload speed.

In 2026, Twitch accepts up to 6,000 kbps For most streamers. Adjust your bitrate to match your connection:
- Less than 5 Mbps in transit: remains between 1,500 and 2,500 kbps
- More than 15 Mbps : You can go up to 6,000 kbps carefree
There's no need to aim too high. Beyond 6,000 kbps, your viewers with slow internet connections may experience interruptions.
Adjust the audio
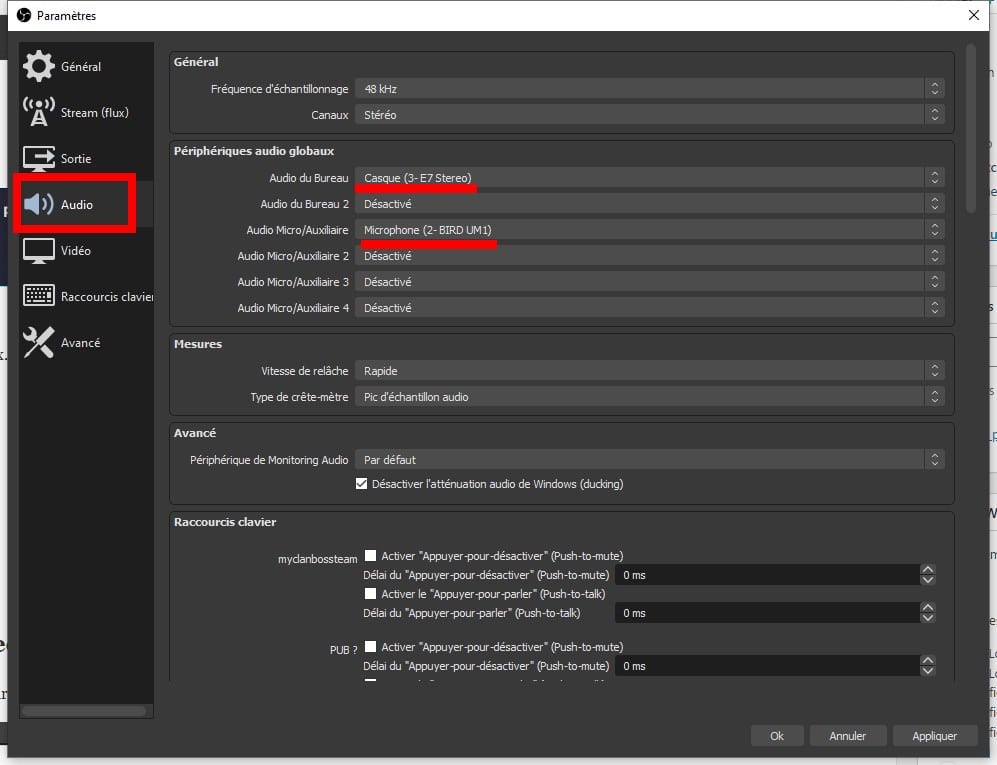
Open the section Audio. Select your headset from desktop audio, and your microphone in microphone/auxiliary audio. You can also apply filters audio directly from the mixer, for example, to reduce background noise.
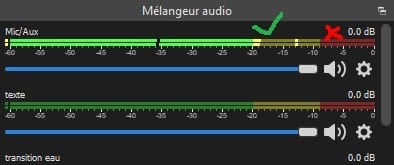
Your level sound appears in the mixer at the bottom of the’interface. It should never go into the red, or the sound will distort. Adjust your microphone's volume so that it stays within the green.
OBS is now set up properly. Let's move on to creating your first scene.
How to make a scene on Twitch with OBS?
A scene is a set of sources (game, camera, overlays) that you display in direct. You can create multiple scenes and switch between them using transitions during the live stream. To create one, do a right click in the “Scenes” panel at the bottom left, or click the button +.
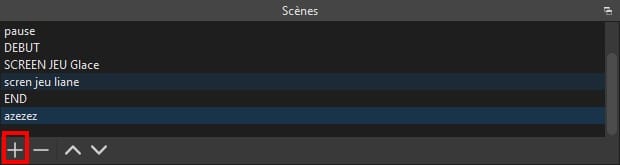
Name your scene, then confirm by clicking OK. The screen remains black For now, that's normal: you'll need to add sources via the panel “Sources” by clicking on +.
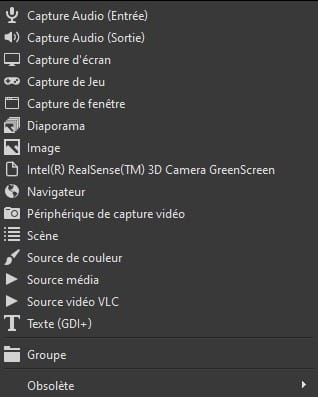
The Most Useful OBS Sources
The list of sources is long, but you only need a few to get off to a good start:
- window capture : Captures the window of your choice. It works in the vast majority of cases; it's the most reliable option.
- game capture : Designed for gaming and often providing smoother performance. It doesn't work everywhere, so keep window capture as a backup.
- Video capture device : your camera (webcam or video capture device).
- Navigator : Displays a web page in your stream. Great for alerts followers and donations through dedicated tools.
- Image and Source of color : To add a background, an overlay, or to hide an area of the screen.
- Media source and VLC Video Source : to broadcast videos during the live stream.
The two sources sound (input and output) are rarely useful at first. OBS Since it's already picking up your microphone and the sound from your PC through the mixer, you can leave them alone.
The basic configuration to set up
For your first stream, keep the setup simple:
- A window screenshot (or game screenshot) to display your game.
- A video capture device for your camera.
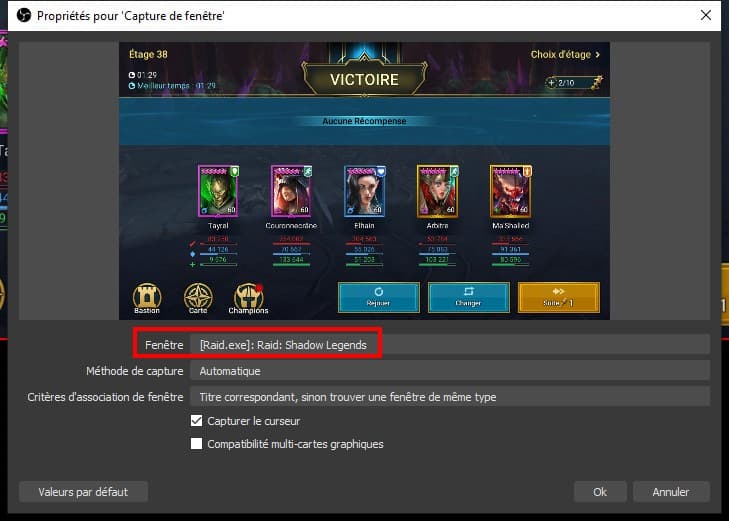
Add the window screenshot, select your window or game, then confirm. The rendering appears immediately in the preview of’OBS.
Attention : If your game is running in full-screen mode, you sometimes have to click on it once for it to appear in OBS. Then repeat the same steps for the video capture device.
You can move and resize each source directly in the preview. The goal is to completely cover the’black screen, because that's exactly what your audience will see on Twitch. Your first scene is ready; you can start your direct.
Tips from Alucare for Getting Your Stream Off to a Good Start
Technique isn't everything. Once OBS Studio Once you've set it up, it's your comfort settings and consistency that make the difference on Twitch.
Make sure you look your best during the live stream
- Have fun. You can hear it and see it on screen. A relaxed streamer keeps their audience engaged longer.
- Check your chat regularly. Reply to messages by real time, that's what creates a connection with your community.
- No second screen? Put the chat window on your phone, or minimize your game window so you can fit the chat next to it.
- Enter the title and category from your live stream via the dashboard Twitch Before launching. A good title and the right game are your primary source of visibility.
Invest in a good microphone and a good camera
Quality sound pass before the video. Viewers will overlook mediocre video quality, but they'll never tolerate poor sound quality. A decent microphone and a reliable webcam are more than enough to get started, without breaking the bank.
Here are the two products I recommend to help you get started easily:
and
Other questions ?
Are you having trouble with a setting, or do you want to take it a step further with OBS Studio ? The Discord and the comment section are there for you.
List of tutorials on Twitch:







 English